Sparse Disk Images

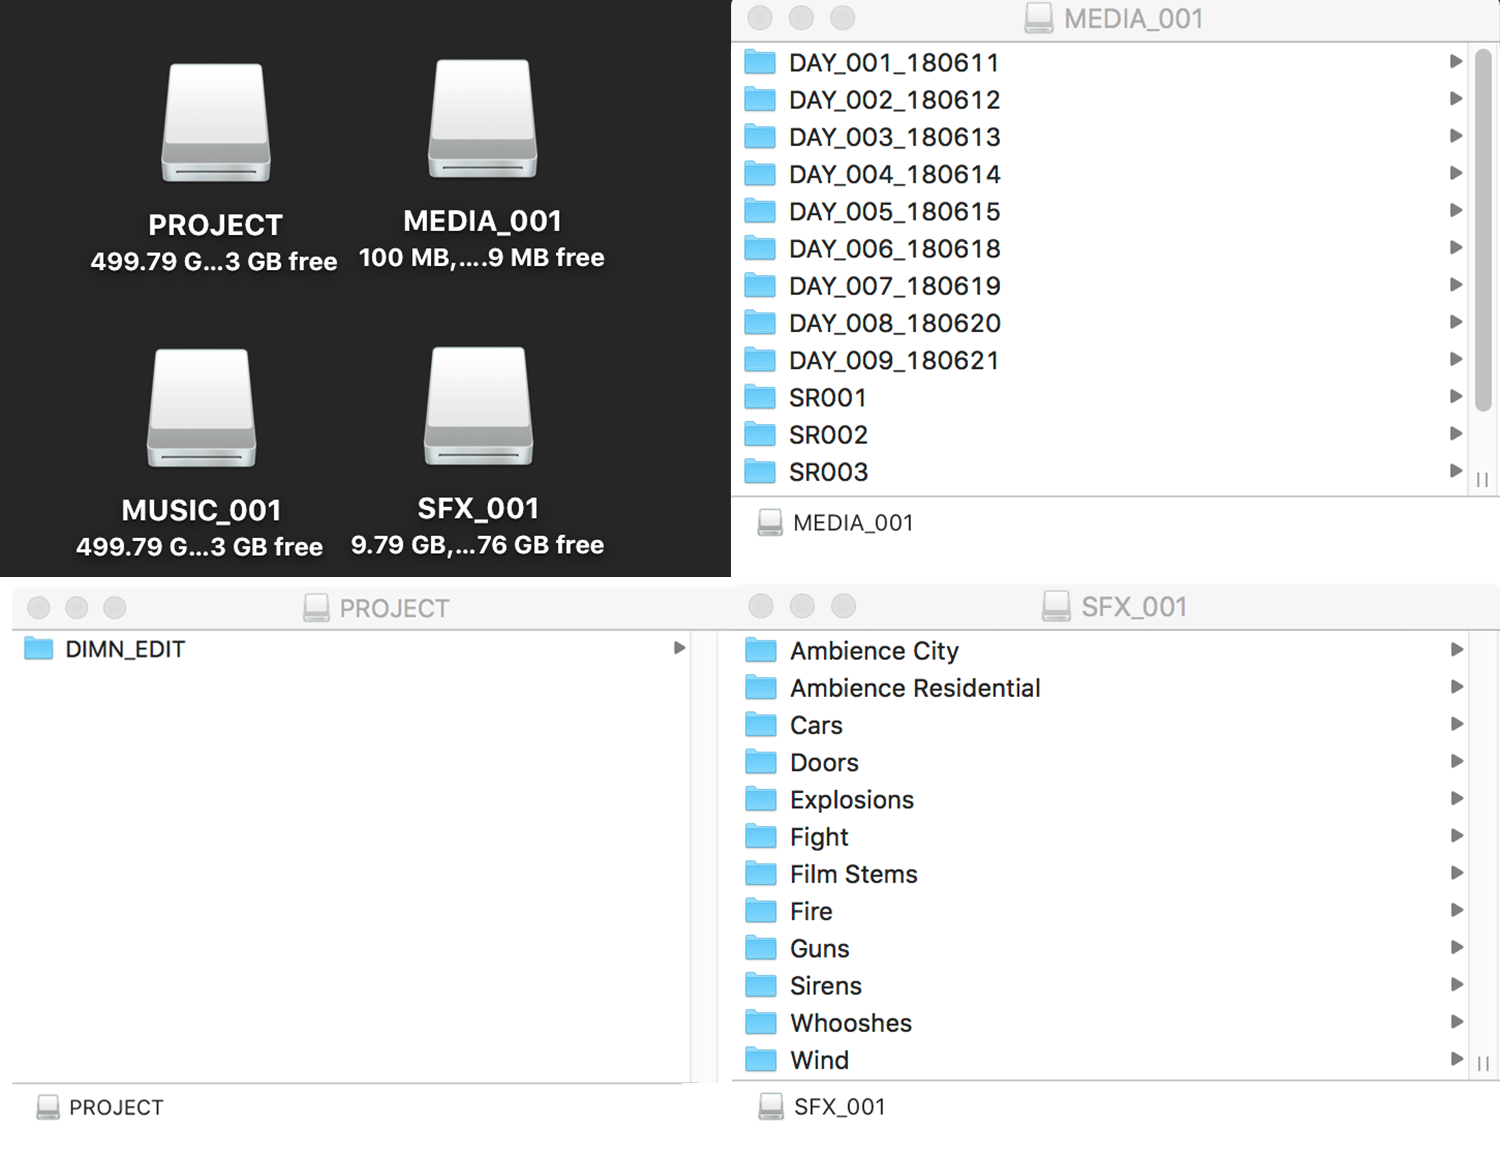
Sparse Disk Images are great when you are working either on Premiere or Avid to keep your media backed up and organized.

You can create these in Disk Utility and format them to use either Mac OS Extended or APFS file system.  Personally, I have seen speed gains with an APFS formatted image.  These can also be encrypted if you are travelling with a drive and don’t want your media to fall into the wrong hands.  It also saves a ton of space instead of partitioning out a big Raid drive.  I usually start each image at 1TB as it doesn’t take up space until you add media to the disk image.  You could have 10x 1TB Images on an 8TB drive and only use the space you need up to 8TB.  Below is a summary of how to create them and how I use them. From there you can implement your own workflow

CREATING:

Here are the Settings I use in Disk Utility.  First go up to File and select New Blank Image.  Below you will see the Image and Drive are labeled as MEDIA_001, the size is 1TB, formatted as APFS, and no encryption. For image format select sparse disk image.    I have heard reports that encryption on an APFS drive does take longer than an HFS+ Format but haven’t tried this yet.

disk Uitility

WORKFLOW:

Below you can see the layout for a small project on either Premiere or Avid.  My main use is to get an 8TB or 16TB raid drive and then add my sparse disk partitions and then I use Chronosync to easily scan and backup the latest media on a daily basis which is simple and automated so I don’t need to think about it.

Sparse Disk Image

Adobe ACE Tech Day - Only the Brave Post Production Workflow

On June 3rd, 2017, I was invited to speak at the Adobe ACE Tech Day event along with the VFX Editor Jon Carr.  We discussed our workflow on the film Granite Mountain, which was eventually retitled Only the Brave.  Below are some highlights from our presentation:

Adobe-ACE-Tech-DAY

Only the Brave was directed by Joseph Kosinski with cinematography by Claudio Miranda, and edited by Billy Fox.  This film is about a group of 20 Wildlands Firefighters that fought to become the first municpally run HOTSHOT team in the country. In 2013, a huge fire claimed the lives of 19 of these heroes. We hope we have told their story as best we could. 

We cut the movie entirely in Premiere Pro.  The switch definitely posed a few challenges for first-time users with primarily Avid backgrounds, but was rewarding once we quickly adjusted. I truly believe Premiere Pro will be the future NLE for feature film professionals.

OVERVIEW:     Below you will see the start of our workflow. They shot the movie mainly with the Sony F65 camera at 4K DCI (4096x2160.) The footage was then sent to Nextlab where it was transcoded to Apple Pro Res 422, synced and sent to Premiere Pro for our Offline edit at 2K.  We were also able to cut the entire movie in 5.1 Surround thanks to the wonderful setup from Fotokem.  Last, one of the highlights of the experience was having the capability to create our own DCPs straight out of Premiere and ready to screen at any theater.

WORKFLOW.jpg

NEXTLAB:     The Nextlab system by Fotokem is a tool that I want available on every show. It ingested the camera negative 4096x2160, did the checksums, syncs all audio ISO tracks, and creates proxy media that matches on-set color. The media was then sent to Premiere Pro to organize for Billy Fox. We have access to it for whatever we want to do throughout the process. If we did repos we were able to change the burn-ins to top or bottom. We could retranscode to 4K or look at anything in 4K. When we needed to pull VFX shots we could create an EDL from Premiere and send it to Nextlab immediately, transcode and send straight to Vendor with no waiting for a facility to turn around or worry about wrong resolution being sent. Jon Carr used this system a lot to transcode the VFX Shots for ILM as OpenEXR files in 4K

NEXTLAB

5.1 Audio:     Premiere made it very easy to setup a surround workflow. One of the main ways was Premiere allowed Standard Tracks, meaning you could edit in a mono or stereo file in any track without worrying about designating between the two like in Avid.  This is a partial scene from one of our timelines:

5.1.jpg

DCP:     We created our own DCPs straight out of Premiere through AME with the Wraptor Plugin. We had a lossless version of our movie that we could take to any theater anywhere in the world and view the movie in 5.1. Usually it costs between 2-5K with a 24-48 hour turnaround to create a DCP at an outside facility. Being in Premiere we could work up until the last minute drop in VFX shots and render out for a screening in about 5 hours. We ended up making 21 DCPS for 15 different theaters across the world.

We encrypted every DCP that we made through DCP O Matic so we never had to worry about security. One day we had three screenings at three different theaters around the same time. Our post PA went to every theater to load the DCP and sent me all of their server certs.  I was able to quickly generate keys for every theatre on my laptop and everyone was able to screen the movie right away. There were times when a last minute screening would arise and I was able to make a key right away and get the DCP loaded wherever it needed to be.  

If you are interested in learning more about the Wraptor Plugin visit this site for great information about the origins of Wraptor and Pixar:  http://www.quvis.com

DCP